
Creating product packaging usually requires several separate steps. You may need design software for artwork, a reliable dieline for the structure, another application for 3D rendering, and a packaging supplier to confirm whether the final design can actually be produced. Pacdora brings many of these tasks into one browser-based workspace.
This detailed Pacdora review from Packaging NextGen examines its 3D packaging mockups, dieline templates, AI tools, export options, pricing structure, benefits, limitations, and alternatives. The short verdict is that Pacdora is valuable for developing concepts and presenting packaging in 3D, but a realistic mockup should never replace technical prepress inspection or a physical production sample.
Pacdora Review: Quick Verdict
Pacdora is a browser-based packaging design platform created for designers, startups, online sellers, agencies, and product brands. Its strongest feature is the ability to combine packaging templates, custom dimensions, artwork placement, real-time 3D previews, and downloadable presentation assets in one workflow.
It is a strong option for:
- Creating fast product packaging concepts
- Generating box and packaging dielines
- Presenting designs through realistic 3D mockups
- Testing colors, artwork, materials, and visual finishes
- Producing images and videos for client presentations
- Reducing dependence on complicated 3D rendering software
- Helping non-designers understand packaging structures
It is less suitable as a standalone solution for:
- Complex structural packaging engineering
- Corrugated packaging requiring exact flute allowances
- Regulated food, pharmaceutical, or tobacco packaging
- Advanced vector illustration and typography
- Final color separation and detailed prepress work
- High-volume production without manufacturer validation
Pacdora Rating by Use Case
| Area | Assessment |
| Ease of use | Excellent for beginners and fast projects |
| 3D packaging mockups | One of its strongest capabilities |
| Dieline availability | Extensive selection with custom sizing |
| AI design assistance | Useful for concepts, scenes, and backgrounds |
| Vector artwork creation | More limited than Adobe Illustrator |
| Structural packaging engineering | Requires expert verification |
| Marketing presentation | Excellent for product visuals and approval |
| Final print production | Useful starting point, not the final approval authority |
What Is Pacdora?
Pacdora is an online packaging design tool that combines a packaging mockup generator, dieline template maker, 3D modeling features, design templates, and AI-assisted tools. Because it runs in a web browser, users do not need to install heavy 3D software before creating a packaging presentation.
A standard Pacdora workflow can include:
- Selecting a packaging style.
- Entering custom dimensions.
- Adjusting material or paper thickness where supported.
- Downloading a dieline.
- Uploading the packaging artwork.
- Previewing the design in real-time 3D.
- Changing the background, lighting, angle, and shadows.
- Exporting images, videos, or production-related files.
Pacdora supports many packaging categories, including:
- Folding cartons
- Mailer boxes
- Shipping boxes
- Rigid boxes
- Gift boxes
- Food packaging
- Cosmetic packaging
- Coffee pouches
- Stand-up bags
- Bottles and jars
- Tubes and cans
- Product labels
- Paper bags
- Retail display packaging
The platform can therefore be used by businesses across cosmetics, food, beverage, retail, e-commerce, supplements, candles, fashion, and consumer goods.
Why Has Pacdora Become Popular?
Traditional packaging design often forces a designer to move between several applications. Artwork may be created in Adobe Illustrator, the structure may come from a separate dieline library, and the finished concept may require Photoshop, Blender, KeyShot, or another rendering program.
Pacdora simplifies this process by combining several packaging tasks inside one platform.
A More Accessible Learning Curve
A small business owner may understand the desired colors, logo placement, and overall packaging style without knowing how to build a 3D model. Pacdora makes the visualization process more accessible by providing ready-made structures and guided customization.
Faster Packaging Visualization
Flat artwork does not always communicate how a design will look across the front, back, side, top, and bottom panels. A real-time 3D packaging mockup allows the user to rotate the package and identify visual problems earlier.
A Large Template Library
Pacdora maintains thousands of dielines, mockups, and design templates. The selection covers popular packaging formats as well as bottles, bags, apparel, containers, books, and other branded products.
Browser-Based Workflow
Projects can be created without installing specialist rendering software. This makes Pacdora packaging design software attractive to freelancers, students, startups, marketing teams, and small businesses that do not need a complete structural CAD system.
Key Features of the Pacdora 3D Packaging Design Tool
1. Realistic 3D Packaging Mockup Generator
The 3D packaging mockup generator is one of Pacdora’s most useful features. Users can upload artwork and apply it to a selected box, pouch, bottle, jar, tube, or other product model.
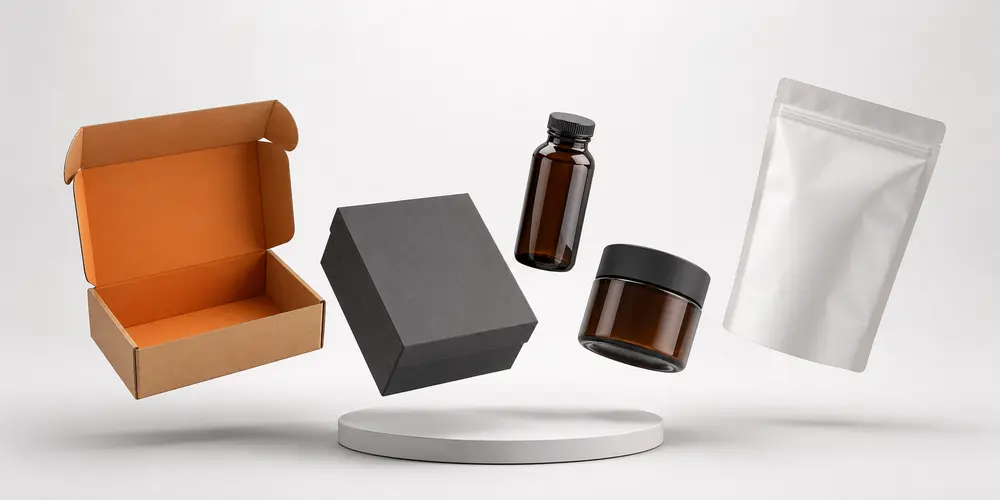
Depending on the selected mockup and plan, users may be able to adjust:
- Camera angle
- Product rotation
- Lighting direction
- Shadow intensity
- Packaging material
- Surface appearance
- Background color
- Scene composition
- Product dimensions
- Artwork placement
These controls help users create presentation-ready visuals without arranging a physical product photography session.
A 3D mockup is useful for:
- Client presentations
- Investor decks
- E-commerce listings
- Social media content
- Product launch campaigns
- Packaging approval meetings
- Retail planning
- Brand style presentations
However, a realistic render shows how the packaging may look. It does not automatically prove that every fold, tab, tolerance, material, or finishing method will work in production.
2. Packaging Dieline Generator
A dieline is the flat technical template used to guide the cutting, creasing, folding, and gluing of a package. It normally includes the main panels, flaps, cut lines, crease lines, glue areas, and bleed boundaries.
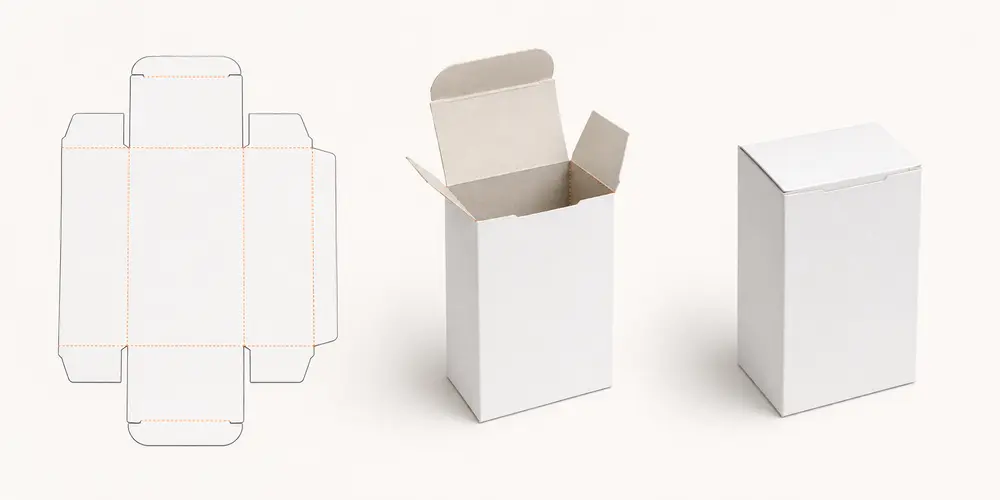
Pacdora’s packaging dieline generator allows users to select a structure, enter dimensions, and download the template in supported formats. This can save significant time compared with drawing every structure manually.
Common dieline export formats may include:
- AI
- DXF
- JPG or PNG previews
The precise formats and export limits can depend on the selected design and subscription.
Pacdora dielines can provide a valuable starting point, but final production files should still be checked by the printer or packaging manufacturer. This is critical when the project uses corrugated board, thick rigid materials, unusual closures, inserts, windows, or machinery-specific tolerances.
3. Custom Dimensions and Packaging Materials
Many Pacdora packaging templates support custom length, width, height, and paper thickness. This helps users create a mockup that is closer to the intended product dimensions.
Users should enter measurements carefully. A small error in product size can create:
- Excess movement inside the package
- Pressure on the product
- Poor closure alignment
- Insufficient insert space
- Bulging side panels
- Weak corner protection
- Incorrect shipping dimensions
Precise measurements matter across every packaging format. Similar planning principles can be seen in this guide to standard envelope dimensions, where insert size, thickness, closure, and clearance affect the final fit.
Material simulations may make a digital mockup look like kraft paper, white paperboard, plastic, metal, glass, or corrugated material. These simulations are helpful for visualization, but they cannot fully reproduce physical properties such as stiffness, coating absorption, flute compression, cracking, scuff resistance, or finish consistency.
4. AI Packaging Design Tools
Pacdora has expanded beyond traditional mockups by offering AI-assisted packaging tools. These functions can help users generate packaging concepts, product scenes, backgrounds, and visual directions from written instructions.
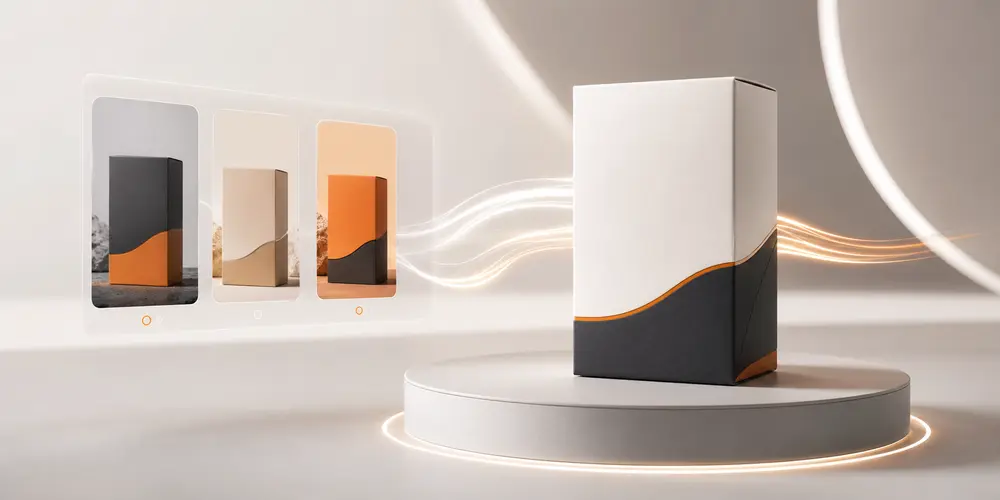
An AI packaging design tool can be useful during the early creative stage when a brand needs to explore:
- Color combinations
- Packaging illustration styles
- Product presentation scenes
- Background concepts
- Seasonal packaging themes
- Market-specific design directions
- Visual campaign ideas
AI-generated packaging artwork should still be reviewed for brand accuracy, image rights, label information, typography, barcode placement, legal claims, and production suitability.
AI can accelerate brainstorming, but it cannot independently determine whether a package meets every manufacturing or regulatory requirement.
5. Background and Scene Generation
A clean background can transform a simple packaging mockup into a stronger marketing visual. Pacdora allows users to place products in digital scenes or generate backgrounds that match the intended brand style.
For example:
- A cosmetic box may use a soft luxury environment.
- A coffee pouch may use natural textures and warm lighting.
- A food package may use an ingredient-focused scene.
- A technology product may use a minimal studio background.
- A sustainable brand may use paper, wood, or plant-based visual cues.
These scenes are useful for marketing, but the product image should not misrepresent the material, size, finish, or actual package customers will receive.
6. High-Resolution Image and Video Exports
Pacdora can export packaging visuals in formats such as PNG and JPG. Selected plans or assets may also support high-resolution renders and MP4 packaging animations.
Animated mockups can show a package:
- Rotating
- Opening
- Closing
- Folding
- Moving between angles
- Displaying multiple panels
These assets can improve presentations and digital product launches. Export resolution, watermark removal, commercial permissions, premium models, rendering speed, and video availability may vary by plan.
7. Collaboration and Shareable Projects
Packaging approval often involves several people, including the business owner, designer, marketing team, printer, packaging supplier, and compliance reviewer.
Shareable links and cloud-based projects can reduce the need to send multiple large files. Team members can review the same visual direction and identify problems before a physical sample is produced.
However, the approved 3D appearance should always be supported by an approved flat artwork file, final specifications, material information, finishing instructions, and production proof.
How to Use Pacdora for Custom Packaging Design
The following workflow explains how to use Pacdora without confusing the 3D presentation with final manufacturing approval.
Step 1: Define the Packaging Goal
Start by determining what the package must do.
Ask:
- What product will it hold?
- What are the exact product dimensions?
- Is the product fragile, heavy, liquid, or temperature-sensitive?
- Will the packaging be displayed in retail?
- Does it need to survive shipping?
- Is an insert required?
- Are there legal labels or warnings?
- What is the expected order quantity?
A package designed for a retail shelf may need different materials and panels than an e-commerce shipping box.
Step 2: Select the Correct Packaging Structure
Search Pacdora’s library for a structure that matches the intended use. Do not select a box only because it looks attractive in 3D.
Review:
- Opening style
- Closure method
- Product access
- Panel count
- Glue placement
- Bottom strength
- Display requirements
- Assembly difficulty
Step 3: Enter Accurate Dimensions
Measure the actual product and allow space for inserts, protective material, accessories, instructions, and manufacturing tolerances.
Do not rely only on a product listing or approximate measurement. Test the physical product whenever possible.
Step 4: Set Material and Thickness
Choose the material that best represents the intended package. If the final product will use corrugated board, confirm the flute type and board thickness with the manufacturer before approving dimensions.
Paper thickness affects folds, closures, panel alignment, and internal space.
Step 5: Download and Inspect the Dieline
Before placing final artwork, review the dieline structure.
Confirm that it clearly identifies:
- Cut lines
- Crease or fold lines
- Bleed area
- Safe artwork area
- Glue tabs
- Dust flaps
- Locking tabs
- Front and back panels
- Top and bottom orientation
Step 6: Create and Place the Artwork
Artwork can be created inside the available editor or prepared in software such as Adobe Illustrator before being uploaded.
Keep important text, logos, and product information away from cuts, folds, glue areas, and panel edges.
Step 7: Review the Real-Time 3D Preview
Rotate the package and inspect every panel.
Look for:
- Upside-down text
- Misaligned patterns
- Artwork crossing folds incorrectly
- Logos hidden by closures
- Important information placed on the bottom
- Mismatched side panels
- Unbalanced typography
- Weak visual hierarchy
Step 8: Export the Correct Files
Export the appropriate assets for the intended purpose:
- Use PNG or JPG for presentations and e-commerce.
- Use MP4 for animated demonstrations.
- Use AI, PDF, or DXF files for further technical preparation.
- Use a shareable link for review and approval.
Step 9: Request a Technical Review
Send the dieline, artwork, dimensions, material requirements, printing method, and finishing instructions to the production partner.
The printer may adjust the file according to its machinery, material, die-cutting process, color workflow, and production tolerances.
Step 10: Approve a Physical Sample
For large orders, complex boxes, inserts, regulated packaging, or premium finishes, request a blank structural sample or printed prototype before mass production.
The article on 3D printing innovations in packaging explains how physical models and test pieces can support packaging evaluation before a larger production run.
Are Pacdora Dielines Really Print-Ready?
Pacdora can generate dielines intended for printing and packaging production. However, the phrase “print-ready” should not be interpreted as “approved for every printer, machine, material, and product.”
A generated dieline may still require adjustments based on:
- Material thickness
- Paper grain direction
- Corrugated flute type
- Die-cutting tolerance
- Folding equipment
- Glue application
- Printing method
- Coating and lamination
- Foil or embossing plates
- Window placement
- Product weight
- Insert construction
The safest approach is to treat the generated file as a strong starting template. The final packaging supplier should verify the structure before the complete order is printed.
Why a 3D Mockup Is Not a Physical Proof
A digital package can look perfectly aligned because the software folds the model mathematically. Real materials behave differently.
Physical paperboard can:
- Crack along a fold
- Shift during die cutting
- Absorb ink differently
- Warp after lamination
- Lose internal space after folding
- Require wider glue tabs
- Compress around a heavy product
- Show color differences under real lighting
Digital approval reduces uncertainty, but physical sampling reveals issues that may not appear on a screen.
Preflight Checklist Before Packaging Production
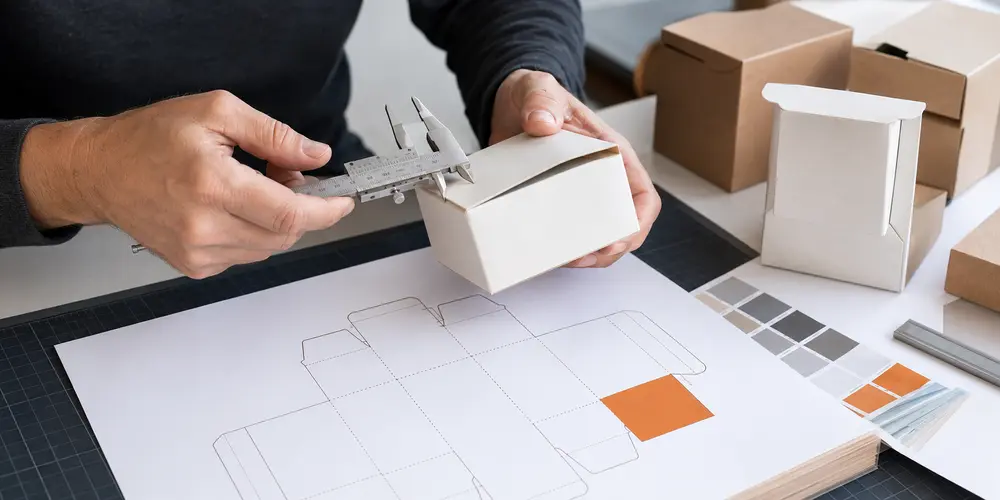
Before sending any Pacdora design for printing, complete the following checks.
Dimensions
Confirm the internal and external dimensions. Add space for product clearance, inserts, liners, and material thickness.
Dieline Layers
Keep cut, crease, bleed, artwork, white ink, spot color, foil, and varnish instructions on clearly labeled layers where required.
Bleed
Extend backgrounds and images beyond the trim edge according to the printer’s requested bleed allowance.
Safe Area
Keep logos, text, barcodes, warnings, and essential design elements safely inside the cutting and folding boundaries.
Glue Areas
Do not place important artwork or coatings inside glue zones unless the manufacturer has approved the treatment.
Color Mode
Use the printer’s required color settings. Many commercial packaging projects use CMYK, Pantone spot colors, or specialized ink separations.
Image Resolution
Check that placed images have enough resolution at their final printed size.
Fonts
Outline or package fonts according to the printer’s artwork submission requirements.
Barcodes and QR Codes
Confirm size, contrast, quiet zones, placement, and scanning performance. Do not assume a code is readable simply because it appears clear in the mockup.
Finishing Instructions
Clearly mark areas for foil stamping, embossing, debossing, spot UV, windows, coatings, and other special finishes.
Panel Orientation
Fold a paper version of the dieline to ensure every panel and text element faces the correct direction.
Physical Proof
Approve a blank sample or printed prototype when the packaging structure, product fit, color, or finishing involves meaningful risk.
Good print preparation also depends on how files and pages are arranged in the production workflow. This guide explains what collate means when printing provides additional context for ordered print sets and finishing.
Pacdora Pricing: Is Pacdora Free?
Yes, Pacdora currently presents a Free plan alongside Lite, Pro, and Business options. Each plan is designed for a different level of use.
Free Plan
The Free plan is useful for:
- Exploring the interface
- Testing selected templates
- Learning the basic workflow
- Creating simple concepts
- Evaluating whether the platform fits your needs
Premium mockups, higher export quality, commercial options, faster rendering, additional AI credits, collaboration features, and advanced downloads may require a paid plan.
Lite Plan
The Lite plan is aimed at users who need more flexibility than the free version but do not require the complete professional feature set.
Pro Plan
The Pro plan is more suitable for freelancers, packaging designers, agencies, and small businesses that regularly create packaging concepts and presentation assets.
Business Plan
The Business plan is designed for teams and organizations requiring advanced collaboration, licensing, higher-quality exports, and larger packaging workflows.
Because Pacdora pricing, credits, plan limits, and export allowances may change, users should check the official Pacdora pricing page before subscribing. Businesses should also confirm whether the selected plan permits their intended commercial use, client work, resale, or team access.
Pacdora Pros and Cons
Advantages of Pacdora
- Beginner-friendly browser interface
- Extensive packaging mockup library
- Thousands of dieline templates
- Custom dimensions for supported structures
- Real-time 3D packaging previews
- AI-assisted packaging concepts
- Background and scene generation
- High-resolution image exports
- Animated video presentation options
- Faster client approval workflow
- No specialist 3D installation required
- Useful for freelancers and small businesses
Limitations of Pacdora
- Advanced features require a paid plan
- A stable internet connection is necessary
- It does not replace complete vector design software
- Complex structural packaging needs expert review
- Digital materials cannot reproduce every physical behavior
- Selected renders may take time to process
- Export and resolution allowances vary by plan
- Some packaging designs may require manufacturer adjustments
- It is not a complete replacement for physical sampling
- Pricing and plan features can change
Pacdora vs Canva
Pacdora and Canva are both accessible design platforms, but they serve different purposes.
| Feature | Pacdora | Canva |
| Main purpose | Packaging structures and 3D mockups | General visual and marketing design |
| Packaging dielines | Strong built-in capability | Very limited |
| 3D packaging previews | Core feature | Limited |
| Social media graphics | Limited compared with Canva | Excellent |
| Vector control | Basic to moderate | Basic |
| Packaging templates | Structure-focused | Mostly visual layouts |
| Real-time package rotation | Available | Generally unavailable |
| Best for | Dielines, mockups and packaging concepts | Labels, graphics and marketing assets |
Choose Pacdora when the project requires a packaging structure, dieline, or realistic 3D package preview.
Choose Canva when the main requirement is a simple label, promotional graphic, brand presentation, flyer, or social media asset.
Many businesses can use both: Canva for basic creative assets and Pacdora for 3D packaging visualization.
Pacdora vs Adobe Illustrator
Adobe Illustrator remains one of the strongest applications for vector artwork and packaging graphics. Pacdora focuses more on simplifying packaging structures and 3D presentation.
| Feature | Pacdora | Adobe Illustrator |
| Learning curve | Easier | More advanced |
| Browser-based | Yes | Primarily desktop software |
| Ready-made dielines | Extensive library | Usually imported or created manually |
| 3D packaging mockups | Built into the workflow | May require additional tools or setup |
| Vector illustration | Limited | Excellent |
| Typography control | Moderate | Advanced |
| Custom artwork freedom | Moderate | Excellent |
| Structural engineering | Limited | Manual unless paired with specialist tools |
| Best for | Fast concepts and presentations | Detailed packaging artwork and prepress |
Pacdora can reduce the time needed to find structures and create realistic previews. Illustrator offers stronger control over typography, paths, illustrations, masks, color separations, and final artwork preparation.
For many packaging designers, the strongest workflow is not Pacdora versus Adobe Illustrator. It is Pacdora with Adobe Illustrator:
- Generate or select the packaging structure.
- Prepare precise vector artwork in Illustrator.
- Upload the artwork into Pacdora.
- Review the finished package in 3D.
- Return to Illustrator for final corrections.
- Submit the approved artwork to the packaging supplier.
Pacdora vs Traditional Packaging Design Software
Specialist structural packaging platforms such as Esko ArtiosCAD are created for detailed packaging engineering and manufacturing environments. They offer a different level of structural control, machine integration, and production planning.
Pacdora is easier for fast concepts and presentation work. Specialist CAD systems are more appropriate when a business needs:
- Advanced structural engineering
- Custom folding mechanisms
- Complex corrugated packaging
- Production machinery integration
- Palletization analysis
- Material performance evaluation
- Manufacturing-specific file preparation
Pacdora lowers the entry barrier. Specialist software provides deeper engineering control.
Best Pacdora Alternatives
The best alternative depends on what part of the packaging process matters most.
Adobe Illustrator
Best for detailed vector artwork, typography, branding, labels, and final packaging graphics.
Esko ArtiosCAD
Best for structural packaging engineering, corrugated design, and manufacturing-focused workflows.
Canva
Best for beginners creating labels, simple artwork, social media graphics, and basic brand assets.
Boxshot
Best for realistic product visualization and marketing renders across different product formats.
Blender
Best for users who need full creative control over custom 3D modeling, animation, lighting, and scenes.
Smartmockups or Placeit
Best for quick marketing mockups when production-ready dielines are not required.
A Packaging Manufacturer’s Design Team
Best for projects that require a completely custom structure, material testing, inserts, prepress review, physical sampling, and final manufacturing.
For a small business, Pacdora may provide the best balance of speed and accessibility. For a complex production project, dedicated structural software or direct packaging engineering support may be more suitable.
Who Should Use Pacdora?
Pacdora is a useful packaging design tool for:
- Small business owners
- Product startups
- Freelance designers
- Branding agencies
- Marketing teams
- Amazon sellers
- Shopify stores
- Etsy businesses
- Cosmetic brands
- Candle companies
- Coffee and beverage brands
- Food businesses
- Supplement companies
- Packaging sales teams
- Design students
A food business, for example, can preview different carton or takeaway packaging concepts before ordering. Brands comparing structures for specific foods can also review these burger types and their packaging needs to understand how product format affects ventilation, grease resistance, portion size, and box construction.
Who Should Not Depend on Pacdora Alone?
Pacdora should not be the only approval stage when the project involves:
- Heavy or fragile products
- Complex inserts
- Custom molded components
- Corrugated shipping structures
- Child-resistant packaging
- Pharmaceutical packaging
- Food-contact compliance
- Tobacco warnings and regulations
- Large windows
- Magnetic closures
- Multiple finishing processes
- Automated high-speed packing
- Very large production quantities
In these cases, the 3D model can communicate the concept, but a packaging engineer, compliance specialist, printer, or manufacturer should approve the final structure.
From Pacdora Concept to Finished Packaging
The most effective workflow uses Pacdora as one part of a complete packaging development process.
Stage 1: Product Analysis
Measure the product, review its weight and fragility, and determine how it will be stored, displayed, shipped, and opened.
Stage 2: Structural Selection
Select a packaging style that supports the product instead of relying only on visual appearance.
Stage 3: Dieline Development
Create or download the structure, confirm its dimensions, and review every cut, fold, and glue area.
Stage 4: Artwork Creation
Develop the brand graphics, product information, instructions, barcode, legal copy, and finishing layers.
Stage 5: 3D Visualization
Use the Pacdora 3D packaging design tool to review panel alignment, visual hierarchy, and overall presentation.
Stage 6: Technical Preflight
Check bleed, safe zones, color mode, image quality, typography, barcodes, glue areas, and finishing instructions.
Stage 7: Physical Sampling
Produce a blank sample or printed prototype to test product fit, material behavior, opening experience, and structural performance.
Stage 8: Final Production
Approve the final specifications, artwork proof, material, quantity, finishing, manufacturing timeline, and quality requirements.
At Packaging NextGen, the most important principle is simple: use digital tools to reduce uncertainty, but validate physical packaging before committing to a large production run.
How Pacdora Helps Small Businesses
Small businesses often have limited design budgets and cannot produce several physical prototypes during the early concept stage. Pacdora can reduce this pressure by allowing teams to compare multiple digital directions before selecting the strongest option.
A small business can use Pacdora to:
- Present a product idea to investors
- Compare box structures before requesting quotes
- Prepare early product listing images
- Discuss packaging with a designer
- Test different brand colors
- Review multiple product variations
- Identify obvious panel-placement errors
- Communicate requirements to a packaging supplier
This makes it a practical candidate for the best packaging design software for small business users who prioritize speed, accessibility, and visual presentation.
The business should still budget for professional artwork preparation, material consultation, technical checking, and sampling when moving into production.
Is Pacdora Worth It?
Pacdora is worth exploring when you regularly need packaging mockups, dielines, 3D previews, or presentation assets. It can save time by keeping multiple packaging design tasks inside one online workspace.
The Free plan may be enough for occasional testing and learning. A paid plan may provide better value for designers, agencies, and businesses that need premium templates, higher-resolution exports, commercial usage, team features, or more frequent rendering.
Pacdora may not provide enough control for advanced structural engineers or designers who need complex vector illustration and prepress capabilities. These users may still benefit from Pacdora as a presentation tool alongside their existing software.
The practical recommendation from Packaging NextGen is to select a plan based on the required exports and project frequency not simply the number of templates advertised.
Frequently Asked Questions About Pacdora
What is Pacdora used for?
Pacdora is used to create packaging mockups, customize dieline templates, preview designs in real-time 3D, generate product scenes, and export presentation or production-related files.
Is Pacdora free?
Pacdora offers a Free plan with selected tools and limitations. Lite, Pro, and Business plans provide additional features, assets, credits, exports, or commercial capabilities.
Is Pacdora good for beginners?
Yes. Its browser-based interface and ready-made templates make Pacdora easier for beginners than many traditional 3D or structural packaging applications.
Can Pacdora create packaging dielines?
Yes. Pacdora provides thousands of dieline templates, and many structures support custom dimensions and downloadable files.
Are Pacdora dielines print-ready?
They are created for packaging and printing workflows, but the packaging supplier should verify dimensions, material thickness, tolerances, glue areas, and machinery requirements before production.
Can Pacdora replace Adobe Illustrator?
Not completely. Pacdora is stronger for ready-made packaging structures and 3D visualization. Illustrator provides deeper vector, typography, artwork, and prepress control.
Is Pacdora better than Canva?
Pacdora is better for dielines and 3D packaging mockups. Canva is better for general graphics, labels, presentations, and social media content.
What file formats can Pacdora export?
Depending on the project and plan, supported outputs may include AI, PDF, DXF, PNG, JPG, MP4, high-resolution renders, and shareable project links.
Does Pacdora work on Mac?
Yes. Pacdora operates through a web browser, so it can be used on compatible Windows and macOS computers without installing traditional 3D software.
Can Pacdora be used on a Chromebook?
Many browser-based functions can be accessed through a modern Chromebook browser. Performance can depend on the project complexity, browser support, hardware, and internet connection.
Does Pacdora support AI packaging design?
Yes. Pacdora offers AI-assisted functions for packaging concepts, backgrounds, scenes, and other visual design tasks.
Can I print directly from Pacdora?
Pacdora can prepare or export files used in packaging workflows, but physical printing and manufacturing are completed through a printer or packaging supplier.
Is Pacdora suitable for commercial packaging?
It can support commercial design and presentation workflows, but users should verify the selected plan’s licensing, export permissions, and commercial-use terms.
What is the best Pacdora alternative?
Adobe Illustrator is stronger for vector artwork, ArtiosCAD for structural engineering, Canva for basic graphics, and Boxshot or Blender for specialized 3D visualization.
Final Verdict
Pacdora is one of the most accessible platforms for creating custom packaging designs online. Its combination of dieline templates, real-time 3D previews, mockup generation, AI assistance, material controls, and presentation exports makes it useful for beginners, designers, startups, and established product brands.
Its greatest value is speed. Users can move from a basic packaging idea to a clear 3D presentation without learning several complicated applications.
Its main limitation is equally important: a beautiful render is not proof that a package is ready for mass production. Final dimensions, material thickness, structural tolerances, color settings, barcode performance, finishing layers, and product fit must still be checked.
The strongest workflow is to use Pacdora for concept development, dieline preparation, visualization, and approval—then involve a packaging expert for technical review, sampling, and manufacturing.
Explore more practical packaging guides and design resources from Packaging NextGen before preparing your next box, pouch, bottle, or retail packaging project.